Summer is a bright and unforgettable time, a wonderful time of relaxation and adventure. There is probably not a single person in the world who does not love summer and does not look forward to it. And what can we say about children! For them, this is generally the most fertile time when they spend a lot of time in the fresh air, in games and fun. You can make summer even brighter, more elegant and more fun by sewing a couple of interesting things, for example, a set consisting of a top and shorts for your daughter:
Made from natural fabrics, loose fit, colorful colors - your baby will be very comfortable in such clothes. Sewing children's clothes will not take much time, which means that a loving handicraft mother will be able to pay more attention to her baby and enjoy wonderful warm days with her.
How to sew shorts for a girl, as in the photo, see in detail.
The pattern for the top can be selected on the Internet or translated from a specialized magazine on sewing children's clothing.
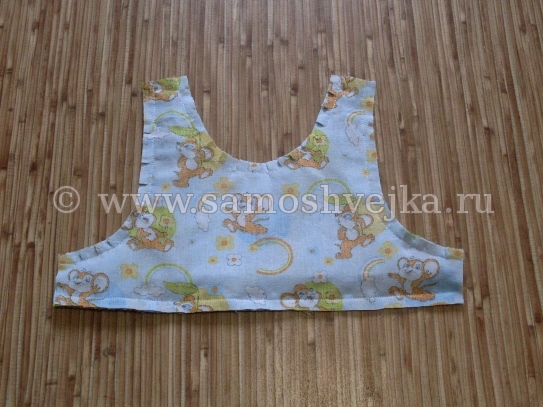
Cutting this simple product will take no more than 30 minutes, since it has a very simple design:
- 2 shelf parts,
- 2 straps,
- stripe on the back
- ruffles at the armhole,
- frills at the bottom of the shelf.

All parts, except the shelves, should be ironed lengthwise.

On one of the details of the shelf you need to baste the ruffles of the armholes and the bottom. The frill details should be evenly gathered in small folds.

After this, you need to place a second similar part on the prepared shelf (face to face), pin both parts together with pins along the entire perimeter, aligning the cuts.

The seam allowances must be cut along the rounded edges. Thanks to this technique, the neckline and armholes of the product will “lay” beautifully after turning and wet-heat treatment.

The hemmed front must be turned out through the open side cut and ironed from the front and back.
Machine stitching should be done along the armholes, neckline and bottom of the front. It will give the product a neat and finished look, serve as decoration, and also ensure ease of ironing the top after washing, since it will fix all the seams in their places.
The back strip and straps should be folded facing inwards along the length and hemmed along the longitudinal sections. The turning seam is 7-10 mm.

The turned parts must be turned out and ironed on the front side.

Then along the edges and in the center of the parts you need to lay finishing stitches, focusing on the width of the elastic that will be inserted into them.

After this, you need to insert a narrow elastic band into the straps using a small pin, and a wide one into the back strip. The ends of the elastic band should be secured with an auxiliary stitch.

You should also overcast the free short sides of the straps. The ends of the overcasting lines should be carefully secured.

The side seam allowances should be pressed towards the back and secured with machine stitching.

The shoulder seam allowances should be secured in a similar manner, ironing them towards the shoulder straps.

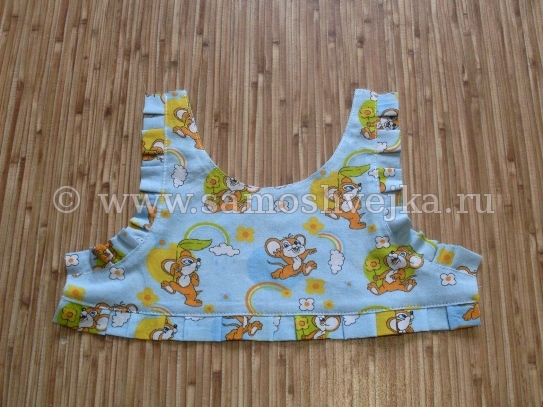
The free ends of the straps need to be stitched to the back strip, placing them in the middle of the part.

When finished, the product should be ironed thoroughly.
Now, as an addition to the top, all that remains is to sew airy shorts, and a light summer suit for the little princess will be completely ready!
Mom is not only the most loving person in the world, but also a cook, stylist and craftswoman in one “bottle”. Anyone can make a baby happy with new outfits, spending very little time. Today’s article is a detailed master class on sewing two simple things for a girl at once: a light top and a skirt with an elastic band.
This sewing option is interesting because you can sew an outfit for yourself using a pattern. The principle of changing the pattern is identical, with only one exception - in the adult pattern, the chest dart must be closed in advance. The skirt is cut exactly the same as a children's skirt. Then mother and daughter will walk like twins, and little princesses love to be like their mother in everything.
Top for girls: pattern
The top will be built on the basic pattern of a children's dress, which can be seen. Take only one measurement from the child - the length of the top. Now proceed to constructing the drawing.
- Measure the length of the top from the neck down. Draw a horizontal line.
- Lower the front and back necklines by 1 cm.
- Divide the shoulder line in half and connect the “lowered” neckline with the shoulder division point with a smooth line on both halves.
- In the back and front armholes, step back 2-3 cm and from this point draw a straight line to the shoulder division point, forming a new armhole.
- Cut off any excess.
The end result is a pattern like this.
When transferring the patterns to the fabric, widen the bottom by 4 centimeters on each side.
How to sew a top for a girl

What you will need to sew a top:
- knitwear - 0.5 m;
- elastic band, width 0.5 cm - 0.5 m;
- decorative tape - 0.5 m;
- bias binding 30 cm;
- threads to match the fabric.
Transfer the pattern onto the fabric, taking into account the seam allowances. If you choose transparent fabric, the allowances should not be more than 0.5 cm, for regular fabrics - 1 cm. In total, you will get 3 cut parts: 2 back halves, 1 front.


Fold the back and front facing each other, pin the side seams and machine sew.

Measure the required amount of elastic on your child. The latter should not tighten, but also not slip. Thread the finished elastic band with needles from the wrong side along the bottom of the product.

Sew the elastic to the top using an elastic zigzag stitch (dotted).

Fold the product in half, facing inward. Sew the elastic band, closing it in a circle. This does not have to be done on a sewing machine; you can do it with hand stitches.

Finish the armhole by stitching the fabric folded inward.

Next, you need to make a drawstring for the decorative tape, due to which the T-shirt will not fall off. You can make it yourself by folding a small edge of the fabric and sewing it on a machine. However, I decided to use matching bias tape for these purposes. In my opinion, this is less labor-intensive and looks much neater.
 That's all. Now all that remains is to thread the decorative ribbon into the drawstring and try it on the child. This is the T-shirt we got.


I sewed sequins with beads in the shape of flowers along the neckline and back sections, but, unfortunately, the photo was not included in the article. You can also freshen up the T-shirt and give it a childish playfulness at your discretion. Now let's move on to the skirt, because the suit must be complemented.
DIY elastic skirt
My daughter, just like all girls, really loves circle skirts because they spin a lot. It is impossible to refuse a child, so it was customary to sew such a skirt with an elastic band. Previously, we published a master class on sewing a circle skirt with a belt, you can check it out. A skirt with an elastic band is sewn much faster and easier.
You will need:
- any material you like, preferably cotton (I used cambric) - 1 meter;
- elastic band, 3-4 cm wide.
Measure the circumference of your child's hips. Divide the resulting number by 2 and multiply by 0.32 - you will get the radius of the skirt.
- Fold the fabric in half and mark the center on the fold.
- From the center, in both directions and downwards, measure the resulting radius and draw a semicircle.
- From the semicircle, measure the length of the future skirt. Draw a second semicircle.
- Cut it out.
You will end up with one big piece.

Use an overlocker or machine to process the edges of the product to prevent them from “crumbling.”

Fold the bottom of the skirt to the width of the overlock stitch and machine stitch along the entire hem.

Measure the required amount of elastic on your child (already around the waist). First check that the elastic band is removed through the hips. Sew its ends.

Place the top of the skirt into the elastic (right sides right). Thread the elastic with needles, distributing the fabric evenly. Then stitch it on the machine using the same elastic zigzag.

The skirt is also ready. Fast, simple, beautiful and the child is happy. This is what our “tandem” looks like.

Certain wardrobe items are invariably present in the collections of every designer brand, as they are must-haves and simply irreplaceable things that can be used in any look. The category of such items for any fashionista almost always includes tops that are so familiar and beloved by everyone. Classic models of minimalist design, original sports or luxurious elegant tops - women need all of them, because they will fit into different suits and help build a laconic image.
The design and decor of modern tops is a fairly broad topic, and sometimes even limitless. Prints, rhinestones, sparkles, sequins, appliqués and inserts from other materials are just a small list of decorations for the top. Some brands offer romantic models with frills in the Greek style. Some people focus on brightness and glamor, others on the avant-garde. Sporty chic also features in the tops of many casual clothing brands. Your ideal top can be silk or cotton, or it can be made of translucent fabric - the choice is not limited to anything! Therefore, go towards a bright style without constraining yourself!
T-shirt base pattern made of elastic materials
T-shirt pattern with wide straps
 Both for sewing a T-shirt with narrow straps and for a T-shirt with wide straps, elastic material is used.
Construct a drawing of the base of the T-shirt using reduced (reduced) values of the dimensional characteristics, reduce the dimensional characteristics of the girth by 15%, and reduce the dimensional characteristics of the length by 5%.
Shorten the front and back by 2 cm (see drawing)
Extend the front and back by 1 cm along the side lines at the waist. Deepen the front and back armholes by 2 cm.
From the new bottom line, put 40 cm up along the middle front line, and 45 cm along the middle back line.
Divide the front and back shoulder lines in half and from the resulting points
set aside 1.75 cm to the left and right (half the width of the strap).
Draw out the model lines of the armhole and neckline in accordance with the drawing.
To ensure the correct position of the neckline and armholes on the finished T-shirt, you should change the angle of the front and back shoulder lines. To do this, lower the front and back shoulder line at the neckline by 0.5 cm, and raise it at the armhole by 0.5 cm.
Some ideas for inspiration!


Sew quickly.MK
VEST!
In the store, a sheepskin vest costs about 5,000 rubles. If you sew a vest with your own hands, it will cost only 1,000 rubles. The style of the vest is simple and functional - a semi-fitting silhouette, a stand-up collar and ties made of leather stripes.
Leftover skins will work for a vest. First you need to make a pattern. Place the polyethylene on your favorite vest and trace along the contours. Attention, in order for the cut to accurately replicate the chosen model, trace all the details - front, back and sides - separately. Determine the direction of the pile and start cutting. Please note that since the vest is double-sided, the reverse side should also be beautiful, so draw lines with a cosmetic pencil. back.
Assemble the vest. A little tailoring trick: to make the seams beautiful and not too thick, connect the parts not as usual, but overlap one another and sew. Sew the side seams first, then the shoulder seams. Align the edges! All that remains is to make a stand-up collar. To do this, cut a strip 7 cm wide and equal to the length of the neck. Attach and sew. Cut two thin strips for ties. A couple of stitches and a vest can be tried on.
MITTS AND GAITERS WITH YOUR OWN HANDS!
Knitted tops and short boots in winter... can be worn even at minus 15 with mittens and leg warmers. You will need textured knitwear and leftover yarn for decoration.
For mitts, measure the circumference at the base of the elbow and wrist, and for gaiters, measure the circumference of the leg under the knee - this is the width of the rectangles, the length is 30-40 centimeters. Transfer measurements to fabric and cut. Then fold and sew. Tuck the edges under, leaving room for drawstrings and a hole for your finger. Try on, cut and stitch by hand. You can decorate your mitts with yarn braided into braids. When putting on mittens, remember that the texture of the items should not be thinner.
Gaiters are sewn in exactly the same way as mitts. Just instead of elastic bands, put laces through them. It is better to wear leg warmers with shoes with heels, so the leg will look more graceful.
FLOOR SKIRT!
A full-length skirt is on catwalks and in fashion magazines, but buying it is a problem. It’s easier to sew it yourself in half an hour.
For a year-length skirt, narrow at the hips and flared at the bottom, you need to choose soft and flexible materials. For example, cashmere knitwear in graphite color. Take two measurements - hip circumference and skirt length. Make a pattern - fold the fabric in half and draw the front of the skirt along the fold. The cut is based on a rectangle with a length equal to the length of the skirt and a quarter of the measurement in width.
A tailor's trick - the front half will be one-piece. To make it flared, draw a line at an angle, approximately at knee level. The main flare will be at the back, so cut out two more halves, which will be the same shape and length as the front part, but in a smaller size. The width of each piece is a quarter of the measurement.
Gather your skirt. First we sew all the seams on a machine, then on an overlocker. Cut a belt 7 centimeters wide. Fold it in half, stitch it and sew it to the skirt. Thread the elastic band inside. Treat the bottom of the skirt with a hot iron and a spider web. The skirt is ready.
The hottest silhouette of the season is the hourglass. For example, a fitted turtleneck, an oversized cardigan and a belt at the waist. This skirt looks great with a white shirt. This skirt is a great option for work, especially if you're tired of a pencil skirt!
FASHIONABLE BELTS!
You can make a new fashionable belt with your own hands without much difficulty. You can sew a stylish accessory in just 15 minutes.
Wide belt. Take the chocolate colored perforated leather and add a beautiful coral colored leather. Measure your waist circumference and draw two stripes on your skin, 15 centimeters wide and a length equal to the measurement plus 30 centimeters. Cut it out. Then the halves of the belt must be glued together using universal adhesive in a spray, but it must be sprayed onto the perforated leather so that no stains remain. Connect the parts, sew along the edge and attach a buckle.
Elastic belt. To prevent such a belt from adding extra volume to your waist, the second layer of drapery should be silk, not leather. The base of the belt will be made of leather. Just cut a strip 14 centimeters wide, the length is your measurement plus 30 centimeters. Cut out the same strip from silk. Connect both pieces and sew the edges. Turn the workpiece inside out and make markings for the drawstrings. To ensure that the marking lines do not stain the skin and can be easily erased later, draw them with a white cosmetic eyeliner. Draw lines at a distance of 4 centimeters from each other and make lines along them. Cut three strips of elastic approximately 45 centimeters long and thread them through the drawstrings. Sew the ends of the elastic bands to the base. Decorate the edges of the belt - cut out rectangles from the leather, glue them first, and then sew them to the base. Attach the fasteners.
BELL SKIRT!
The hit of the season is the bell skirt. This style suits everyone without exception. A long fluffy skirt with a narrow waist looks very elegant. You can sew such a skirt in half an hour!
Take two meters of thin gabardine, preferably a classic dark blue color, which contains both wool and polyester. This fabric will hold its shape well, and the folds at the waist will not be too voluminous.
First you need to make a pattern. Just draw two squares with sides of 150 centimeters on the fabric and cut them out. Fold the squares diagonally. To make the skirt flared, make a quarter circle at the base of the cut. Simply measure the length of the skirt from the right angle and draw the lines of the bottom and waist in a circle.
Cut out two parts of the skirt, connect the side seams and machine sew them, leaving 20 centimeters on one side for the fastener. To prevent the edges from fraying, finish them with an overlocker and sew on a zipper. Take only one measurement - waist circumference. Then gather the top of the skirt into bow pleats so that when gathered it matches the measurements. Pin the folds and secure with a stitch.
To make a belt, just cut a strip 6 centimeters wide and 70 centimeters long and sew it to the skirt. Finish the edges of the belt with an overlocker, hem the bottom and feel free to try on your new skirt.
A fashionable bell skirt is a universal item. It is ideal for every day and suitable for an evening out. The main thing is that the top of the set is fitted and not very long.
RECTANGLE CARDIGAN!
It's slushy outside, but you'll feel warm and cozy in a luxurious knitted cardigan that you can sew with your own hands in half an hour. The cut of the cardigan is based on a rectangle. But the most important thing is that it will not be a simple cardigan, but a transformer. It can be worn as a short jacket with a hood or as an elegant short coat. For a cardigan, use a wool knitted fabric in a basic purple tone with a bouclé texture. Sometimes this fabric is called Tyrolean cloth. It holds its shape well and does not need edge processing.
Draw a rectangle 140 centimeters wide and 100 centimeters long on the fabric and cut it out. Take the back width measurement. Fold the fabric with the right side inward, set aside half the measurement from the fold line and draw a line 30 centimeters long. This will be the shoulder point. Draw the armholes - just measure 13 centimeters from the shoulder point and make a cut.
The sleeves are simply two rectangles 70 centimeters long and 30 centimeters wide. Fold them in half and machine sew them. A little trick. Since the fabric is knitted, all the stitches should stretch a little, so sew all the details with a zig-zag stitch.
The cardigan can be worn with a brooch at the collar, or it can be folded into a hood and it will look like a jacket.
YUYUKA PENCIL!
If you want to attract attention, be sure to wear a beautiful, tight pencil skirt. You can sew such a skirt in one evening. To ensure that the skirt fits well, take a piece of thin woolen fabric with the addition of elastane. A great option for autumn is the rich burgundy color.
Fold the fabric right side inward. Then take two measurements - waist circumference and hip circumference. From the fold line, set aside a quarter of the hip measurement, and from the top - the length of the skirt to your liking. Measure 20 cm from the waist line and draw another line - the height of the hips.
To ensure the perfect fit of the skirt, you need to make a dart. The tuck width is 3 cm, the depth is 8 cm, connect all the points into a triangle and round off the side line. Use the same principle to make the second part of the skirt. Just don’t forget about the seam and darts, they should be a little larger, about 5 cm wide, 10 cm deep. Carefully cut out the parts, leaving seam allowances. Attention – there is no need to cut out the darts.
Baste all seams and use pins to gather and pin excess fabric. Sew the back seam, leaving space for the fastener and the cut - approximately 20 cm each. Finish all seam allowances using an overlocker. Sew on a zipper and make a waistband - simply cut a strip 6cm wide and 70cm long, fold it in half and stitch it to the skirt. Hem the bottom.
A pencil skirt will help out when it seems like there is nothing to wear. After all, it looks great with both a T-shirt and a smart blouse.
LEATHER SKIRT!
Do you think autumn is the time to fit into trousers and you’ll have to forget about skirts until next summer? No! In autumn you need to wear skirts, leather skirts.
This season's hit looks can be sewn in just an hour. The style is called four-blade - it has only four parts of the cut, four wedges. The skirt will be flared at the bottom, this style will suit any figure. Let's add two pockets with zippers, it will be very functional.
They take only one measurement - waist circumference - and make a pattern. An angle of 45 degrees is drawn on the fabric, and a quarter of the measurement is placed in it. Now the rays measure the length of the skirt 50 cm and cut it out.
There will be four such wedges - two for the front of the skirt and two for the back. Lay out the blanks on the leather, trace and cut out, leaving allowances of 7 mm.
The pattern is ready. All that remains is to draw the pockets and cut them out of leather.
The skirt remains to be sewn, but you need to start with the pockets: take the zipper and attach it from the inside out, mark its length and cut out the entrance to the pocket.
To sew a zipper smoothly, you first need to glue it to the skin, and only then stitch it on a machine.
Then the pockets are sewn on. The front of the skirt is almost ready, all that remains is to fold the two halves and sew the central seam. And now a little trick - do not iron the seams on the leather, but simply smear them with transparent glue close to the stitching and glue the allowances in different directions.
Then the side and back seams are sewn together, leaving 18 cm at the back for the zipper. The lining is sewn in the same way as the skirt, only it is made a few cm shorter.
All that remains is to make a belt: you need to cut out a strip of leather with a length equal to the measurement and a width of 5 cm. A skirt is sewn to it on one side, and a lining on the other. All that remains is to sew in the zipper. The skirt is ready.
This leather skirt can be worn with blouses, jackets and even T-shirts. A convenient and unpretentious thing - put it on and go. And you don't need to wash or iron.
NOODLE DRESS!
Who said that loving noodles is bad for your figure? Breaking stereotypes: noodle fabric will make it perfect. The noodle dress is light and practical.
The silhouette is narrow, emphasizing the figure. The cut is based on a rectangle, there is only one side seam. Let's add sleeves of current length to the elbow and a stand-up collar.
You need to take two meters of thick knitwear, preferably thick cotton knitwear with the addition of elastane, which in its texture resembles noodles.
First we make a rectangle pattern. We take only one measurement - the girth above the chest, this is the width of the rectangle, the length is 90 cm. We cut it out of the fabric. Fold it in half and sew the side seam on the overlocker.
To cut out the top of the dress, simply apply your favorite T-shirt and cut out the armholes and neckline. Cut and sew the shoulder seams.
We cut out the rectangles again, only now they are 35 cm long and 30 cm wide – these are the sleeves. Fold them in half and stitch them.
To correctly cut out the top of the sleeve, you need to measure the length of the armhole and transfer it to the workpiece. Cut off the excess. All that remains is to sew the sleeves to the dress.
Cutting out a stand-up collar is as easy as shelling pears: it is also a rectangle, its length is 40 and its width is 15 cm. We cut it out, fold it in half and stitch it. Turn it inside out. All that remains is to sew the collar on the wrong side, and the dress is ready.
The noodle dress is a universal wardrobe item; it never goes out of style, so it will last you more than one season.
PRINCESS ON THE PEA!
A polka dot dress of the right style can be a wardrobe classic. This outfit will always be just right.
For the base of the dress, buy thin silk with large polka dots, and for gathering on the shoulders - small polka dots. Take a fabric 140 cm wide and mark the length of the dress - approximately 90 cm. Make a cut along the mark and... tear it. Sometimes it is better to tear the fabric so that the edge is perfectly even. Fold a rectangle of fabric and make a 25 cm long cut along the fold line. This will be the armhole. Sew the side seam, remember to leave 25 cm for the second armhole. Finish the edges of the armholes, top and bottom of the dress with a zigzag stitch.
Make a beautiful frill with small polka dots. Tear off two strips 20 centimeters wide and 140 centimeters long. Sew them on a machine. To balance both sides of the dress, finish the top edge of the frill with black bias tape. Sew the frill to the dress and make a drawstring for the elastic. Place the frill at the top and make two stitches 2cm apart. This will be a drawstring. Sew a satin ribbon to the remaining part of the frill from the inside. This will be a continuation of the drawstring. Gather the frill with an elastic band. The dress is ready!
SKIRT WITHOUT SEAMS!
The fashionable length of the skirt this summer is floor-length. You can quickly sew such a skirt with your own hands. The cut of the circle skirt is based on a square. For this style it is best to use thin viscose knitwear. Draw a square with sides of 140 cm on the fabric. Cut it out and fold it twice. Measure your waist circumference and cut out a circle equal to the measurement.
For the belt, cut a strip of fabric 150 cm long and 15 cm wide. Finish the edges with an overlocker and sew the belt to the skirt. To prevent the knitted belt from stretching during wear, sew a strip of leather. The length of the leather strip should be equal to the waist circumference, the width should be 6 cm. The skirt is ready.
Top. Cut a rectangle of fabric 70 cm long and 60 cm wide. One seam and the top is ready. Make ties from scraps.
DRESS IN ONE STROKE!
The dress can... be drawn. A few touches and you have a beautiful painting in front of you, which you can not only admire, but also wear.
The style of the dress for the pattern should be very simple. Take white satin and special fabric paints in the colors of grass, sun and orange. This dress will be washable.
First, make a pattern - cut out a rectangle of fabric 160 cm long and 74 cm wide. Fold the rectangle in half, step back 12 cm from the edges and draw upward lines 65 cm long. These will be the side seams. Cut a neckline in the center. Lay your fabric out on the table and start drawing!
First you need to paint the outline of the pattern and the seam lines. Gently spray paint around the edges. Then twist the fabric into snails and apply green paint. Take colored paints and draw flowers in a few strokes. Draw leaves and small details using fabric outlines. After two hours, when the fabric is dry, fold the base in half and sew the side seams. The dress is ready!

It happens that there are good pieces of fabric left over, it’s a shame to throw them away, so they are hoarded in the hope that someday there will be a use for them. But you can sew so many beautiful, necessary and useful things/accessories, various little things, by combining fabrics of different colors and textures. You just have to do it, and for this, of course, you need desire and time, the first is usually available, but there is not enough time.
This is the little top I got for my daughter, she really liked it and has already worn it more than once. Spend only 15-20 minutes, or even less, and the update is ready. If you don’t want an open back and the fabric allows it, make both halves the same, and the straps can be neatly tied on the hangers.
You can also add a flounce from the same fabric along the bottom or sew on lace.
If the fabric is plain, feel free to decorate it with stickers, bows, rhinestone appliqués, etc. The top can be turned into a dress, you just need to extend the pattern, expanding it downward. Or sew a skirt as a set.
Just for fun, below is a mini-pattern, and on top is a piece of fabric from which the top was made.
Og = 55 cm
Materials:
- leftover knit fabric (from my camouflage dress);
- a little knitted tape;
- threads;
- two black plastic tips.
Here is a scaled-down diagram of the pattern, perhaps it will be useful to someone.

Description of sewing a top for a girl:
1. There are only one or two jobs here and it’s too much. So, we cut out a top from the fabric according to the planned pattern.
Mine works with one seam on the back, you can do two on the sides, again depending on fabric availability.
2. I finished the top front with bias tape, then starting with the tie I moved to the armhole, back, armhole and second tie. Make the ties of the required length so that you can tie them with a bow. I did this again using a special foot.
3. If you fold the bottom and hem it, it will turn out a little short, so I simply overlaid it, stretching the fabric a little (creating the effect of ruffles), setting the stitch parameters - width 5, pitch 0.7.

And if the length allows, you can bend it by the amount of allowance and sew it with a single or double straight stitch or zigzag.
Make tips at the ends of the ties or simply tie a knot.


